Get Creative: Make a Market Stall Out of Paper

Here is a fun way to create your own Tudor market stall! You will only need a few supplies. While town shops for retailers and craftsmen were permanent structures, market stalls were often moved from place to place, especially during fairs when sellers traveled longer distances. Structures needed to be simple yet sturdy. Many market stalls were covered with cloth, but some had wooden roofs. Shelving, crates and boards held goods for easy access.
We will be creating a simple model made of craft paper and covered with a “wooden” craft paper roof. It will be up to you to provide your market stall with fruits, vegetables, bread, leather goods or whatever products you want to sell. Be creative! You can use paper, felt, beads or pre-made miniatures to stock your stall. Share your creations with us when you are finished. Our event will stay open for an extra week, so you will have time to share photos in our comments section.
We created a brown paper stall to simulate wood. We have stocked it with greens/lettuce, celery and grapes. What else could we add to this produce (fruit and vegetable) stall?
There a quite a few steps to this project, but don't be worried. We have provided a picture for every step of the process. Go slowly and ask for help if you need it.
Here is what you will need to create your market stall:
One 8” x 10” piece of cardstock (any color you like). Cardboard will not work for this project, as we will be doing a lot of folding. You can experiment with cardboard or other materials later if you like.
Tape and white glue
Two toothpicks
Ruler
Pen or pencil
Scissors
Here is how to construct your stall:
Measure and draw a line 2 ½ inches from the top of the paper. Make sure the long side is at the top. Crease your paper at this line. This will form the roof of your stall.

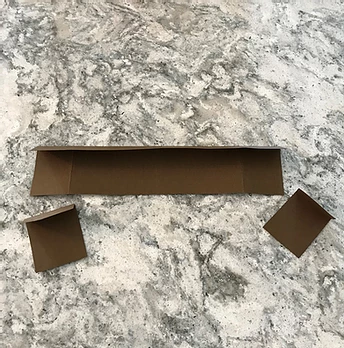
Make another line across the paper 2 ½ inches from the bottom. Cut this piece away and keep it.

Fold both the large and small pieces in half to make a crease.

Open both pieces and fold each side toward the middle to create creases on each side of the paper. This will divide each piece into thirds lengthwise.

Cut away the top side squares on the larger piece of paper at the creases. Discard squares. Notice that in the photo below the roof is curved over the top of the stall.

Draw a line ¾ of an inch from top of short piece of paper and crease along line.

Cut 1½ inches off each end of the short piece of paper. Discard scraps. (See above.) Clip both ends of short piece along end folds from the top just to the fold below. Cut off small rectangles and discard.


Use tape to secure the short piece of paper to the inside sides of the stall with folded top edge facing out. Tape flush with the front of the stall. Square up stall along the back crease.

This next part is a bit tricky. Poke holes in the roof near the front on both sides with your toothpick or the point of a pen. Be careful. You may need someone else to help you. Make them as even as you can. You may want to use a ruler to measure spacing.

Make corresponding holes on the counter of the booth on each side.

Cut the sides of the stall a bit shorter by an inch and discard scraps.

Set toothpick “poles” into holes. Add a dab of glue to the ends of the toothpicks to keep them in place.

Decide what you want to sell and add items to your stall!
When the market closes, move all of your goods inside, remove your poles and fold your counter up and your roof in for the night!

HAVE FUN!!

Comentários